Next: About link annotations Up: Annotation Editing Previous: Creating an annotation file manually
If you plan to use WAVE with records containing signals that must be annotated independently, read this section.
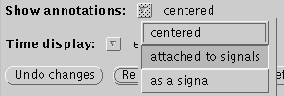
Using the Show annotations
![]() menu button
in WAVE 's View window,
menu button
in WAVE 's View window,
WAVE draws the signals in order of signal number from the top to
the bottom of the signal window, beginning with signal number 0 at the
top of the signal window. When annotations are attached to signals,
WAVE draws them about 2 mm above the center of the range of the
attached signal (except for special annotations that are displaced
above or below the usual level). Although this presentation usually
helps to avoid the visual confusion that might result from drawing
annotations directly on the associated signals, it may contribute to
confusion if the spacing between signals is too small (as may happen
if the signal window is reduced in height, or if many signals are
displayed). If this becomes a problem, try increasing the height of
the signal window (by dragging on the resize handles on the window
frame), or displaying only a subset of the signals (by specifying
which signals are to be shown in the Signal list field in WAVE 's
Analyze window, and selecting `listed signals only' from the
Draw:
![]() menu in WAVE's View window).
menu in WAVE's View window).
In multi-edit mode, annotation editing operations are slightly
different from those described above. The most important difference
is that you must always point to the desired signal when inserting or
moving annotations. In this mode, the chan field in the Annotation
Template window does not determine the chan field of an inserted
annotation; rather, the signal to which you point determines the
chan field, and the chan field in the Annotation Template
window is updated accordingly after each insertion. To move an annotation to
a different signal, simply select it and drag the pointer to the
desired time and signal. If you wish to change the chan field of an
annotation without changing its time, select the annotation and use
the
![]() and
and
![]() keys to move it to the
desired signal. Hold down
keys to move it to the
desired signal. Hold down
![]() during these operations to copy the
annotation, rather than to move it (simultaneous annotations are
permitted if their chan fields differ).
during these operations to copy the
annotation, rather than to move it (simultaneous annotations are
permitted if their chan fields differ).
George B. Moody (george@mit.edu)