Introduction
Using the WFDB Software Package, researchers have direct access to large collection of PhysioBank databases consisting of a wide variety of physiological signals. This tutorial aims to provide guidance and instructions for researchers familiar with the WFDB Software Package who are insterested in processing PhysioBank databases on a distributed cloud environment. The tools used on this tutorial include StarCluster, Amazon EC2, Octave, and Hadoop. A computationally intensive example is shown using WFDB's function for multiscale entropy, mse and surrogate data testing. The example processes all ECG signals from the MGH Database using Hadoop's Map interface to manage the working queue of 250 records.
Cluster Deployment
Deploying and managing a cluster is often a non-trivial task. Therefore, we will be using StarCluster to quickly and simply create a suitable cluster on Amazon EC2. The following assumes you already have an AWS account, so if you do not, head over toAWS and create one.
1. Installing StarCluster
Detailed and up-to-date steps can be found in StarCluster's installation documentation. However, many users can install the project using pip:
pip install StarCluster
Note: Depending on your account permissions, you may have to use sudo or contact your system administrator for the above command.
2. Configuring StarCluster
Detailed steps can be found in StarCluster's quickstart guide. However, for a WFDB-specific cluster the following steps should be followed.
- First, create a config file by running:
$ starcluster help
StarCluster - (http://star.mit.edu/cluster)
Software Tools for Academics and Researchers (STAR)
Please submit bug reports to starcluster@mit.edu

cli.py:87 - ERROR - config file /home/user/.starcluster/config does not exist

Options:
--------
[1] Show the StarCluster config template
[2] Write config template to /home/user/.starcluster/config
[q] Quit

Please enter your selection:
Enter 2 to create a new config file from the template.
-
Second, update the template to correctly specify your [aws info]:
[aws info]
aws_access_key_id = #your aws access key id here
aws_secret_access_key = #your secret aws access key here
aws_user_id = #your 12-digit aws user id here
-
Third, create a WFDB keypair for accessing the instances that will be created:
starcluster createkey wfdbkey -o ~/.ssh/wfdbkey.rsa
Note: If this step fails, you may need to ensure that the user specified in the [aws info] above has privileges to instantiate new instances. This can be done from the Amazon EC2 dashboard.
Finally, add WFDB-specific cluster templates from this project's config to yours:
curl https://physionet.org/tutorials/cloud/config >> ~/.starcluster/config
- First, to create the volume:
starcluster createvolume --shutdown-volume-host --name=physionet 20 us-east-1c

...

>>> Leaving volume vol-d555839a attached to instance i-c4d0dc2b
>>> Terminating host instance i-c4d0dc2b
>>> Terminating node: volhost-us-east-1c (i-c4d0dc2b)
>>> Your new 20GB volume vol-d555839a has been created successfully
>>> Creating volume took 2.356 mins
NOTE: The volume availability zone, us-east-1c above, should match your AWS availability zones which can be obtained by running starcluster listzones. The best choice is likely the same as your cluster location which can be obtained by running
starcluster listclusters
-
Once the volume has been created, make two changes to the ~/.starcluster/config file:
- In the [cluster wfdbcluster] template, uncomment the line VOLUMES = physionet
- In the [volume physionet] template, provide the correct VOLUME_ID (in this case vol-d555839a).
- wfdbcluster-small: 2 node
- wfdbcluster-medium: 4 node
- wfdbcluster-large: 8 node
3. Deploying Your Cluster
To deploy the most basic WFDB-specific cluster run:
starcluster start -c wfdbcluster mycluster
After the cluster has started, you can ssh to the master node as root by running:
starcluster sshmaster mycluster
Finally, you can temporarily stop the cluster by running:
starcluster stop mycluster
Or terminate it entirely by running:
starcluster terminate mycluster
Additional AWS Storage (Optional)
For large data it is generally inefficient to download it onto to each new cluster. Instead, it is preferable to set up additional volumes which can be attached to each cluster as described in StarCluster's Using EBS Volumes for Persistent Storage. As an example, we will create a 20GB volume to store (some) PhysioNet data, which can be resized to hold more if necessary.
After these changes have been made the EBS volumes will be available at MOUTH_PATH (which has been set to /data/physionet) each time the cluster is started. Consequently data will be available without having to download it onto the cluster again.
Of course, sometimes it may be convinient to resize the volumes--e.g., if you have more data than available space. This is done quite easily using StarCluster resizevolume. Using our example from before, the following command would double the capacity of our storage from 20GB to 40GB.
starcluster resizevolume --shutdown-volume-host vol-d555839a 40
Template AWS Clusters
In addition to the wfdbcluster cluster template provided, there are also three others that were used for benchmarking:
Each of the benchmark clusters uses m1.small instance types which provide a good balance of performance for cost; however, the could easily be modified to take advantage of more powerful EC2 instance types which would be expected to further improve performance.
Installing the WFDB Toolbox in AWS
The WFDB Toolbox for MATLAB/Octave is packaged with Linux binaries that should work on the AWS instances provided in this tutorial. It is best to install the toolbox on persistent storage so that this installation process does not have to be repeated when re-starting your cluster. To install the toolbox on an EBS volume mounted on "mnt", run the followign commands from the cluster shell:
wget http://physionet.org/physiotools/matlab/wfdb-app-matlab/wfdb-app-toolbox-0-9-6-1.zip /mnt/
cd /mnt/ ; unzip wfdb-app-toolbox-0-9-6-1.zip
export LD_LIBRARY_PATH=/mnt/mcode/nativelibs/linux-amd64/lib64/:$LD_LIBRARY_PATH
export PATH=/mnt/mcode/nativelibs/linux-amd64/bin/:$PATH
Note: You may want to add the "export" statements to your .bashrc file so that the toolbox is on your system path when the cluster restarts.
Loading MGHDB into Hadoop HDFS
This example will load PhysioNet's MGH Database into Hadoop's distributed file system, HDFS. The MGH Database is about 4 GB in size. To store the dataset into HDFS run the following commands in the cluster shell:
#Get the shell script from this tutorial
wget  http://physionet.org/tutorials/cloud/wfdb-hadoop-configuration.sh .
wget  http://physionet.org/tutorials/cloud/prepare-dataset.sh .
#Begin import
./prepare-dataset.sh
Note: To load other datasets into HDFS, modifiy the prepare-dataset.sh script accordingly.
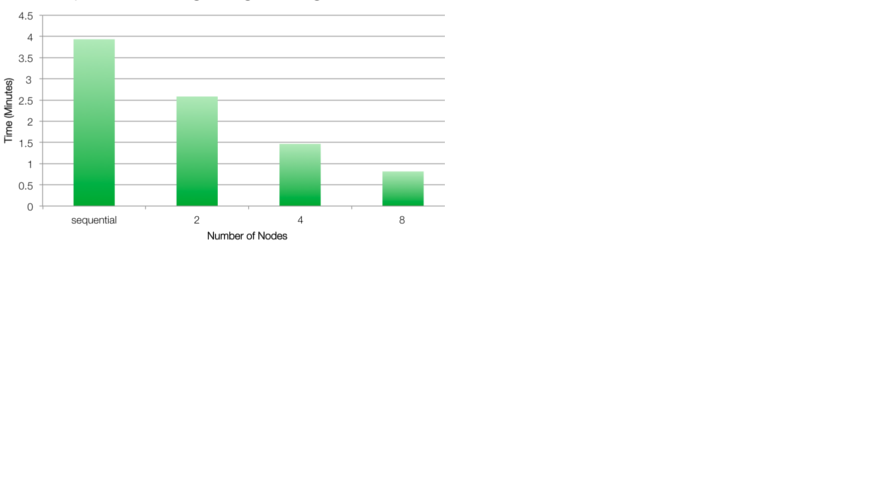
Benchmark Example
The benchmark example described here uses several WFDB functions, processed in all EGG signals of the MGH database. For each
ECG signal generated, a surrogate dataset of 20 signals is derived by amplitude adjusting the signal (see figure below). We then measure the short term multiscale entropy slope and test for its significance using the 20 surrogate series. The computation is expensive on a per record basis, and the Hadoop Streaming API is used to manage the working queue (ie, we only use the Map component, with no Reduce function). For further details on this example please see the Naumann and Silva 2014 citation on top of this webpage. The benchmarking examples here use the file mghdb.ind, which contains a list of records (one per row) to be processed.

1. Running on a single Node
To run the example on a single cluster, enter:
#Download necessary files
wget http://physionet.org/tutorials/cloud/single-annotate.sh .
wget http://physionet.org/tutorials/cloud/least_sqfit.m .
wget http://physionet.org/tutorials/cloud/mse-map.sh .
wget http://physionet.org/tutorials/cloud/shuffle.m .
wget http://physionet.org/tutorials/cloud/surrogate-test.s .
#Run on the single node
time ./single-annotate.sh /physionet/mghdb/mghdb.ind
2. Running on the entire cluster
To run the example on the entire cluster, enter:
#Download necessary files
wget http://physionet.org/tutorials/cloud/hadoop-annotate.sh .
wget http://physionet.org/tutorials/cloud/least_sqfit.m .
wget http://physionet.org/tutorials/cloud/mse-map.sh .
wget http://physionet.org/tutorials/cloud/shuffle.m .
wget http://physionet.org/tutorials/cloud/surrogate-test.sh .
#Run on the cluster and get time
time ./hadoop-annotate.sh /physionet/mghdb/mghdb.ind /physionet/mghdb/mghdb.ind
The output will be written to Hadoops default directory in HDFS (/user/root/output/), which can be accessed via the 'hadoop' command. To copy the contents to the local file system, run:
  mkdir hadoop-output
  hadoop fs -cp /user/root/output/part-* file:/root/hadoop-output/
Note that Hadoop requires the output directory to be empty before running any MapReduce jobs like the one above. If you wish to repeat this test, or run the script again, you can delete the previous content generated on HDF's output directory by running the command:
hadoop fs -rmr /user/root/output
References
When referencing this material on you work, please cite the following
reference along with the standard citation for PhysioNet:
Naumann T, Silva I. "Scaling the PhysioNet WFDB Toolbox for MATLAB and Octave."
Computing in Cardiology 41, 2014 (September 8, 2014)
Supporting Files
Name Last modified Size Description
Parent Directory -
wfdb-hadoop-configuration.sh 2014-09-24 11:27 376
config 2014-09-23 17:01 1.2K
header.shtml 2014-10-04 15:58 11K
AWS.png 2014-09-24 17:40 12K
|
If you would like help understanding, using, or downloading content, please see our Frequently Asked Questions. If you have any comments, feedback, or particular questions regarding this page, please send them to the webmaster. Comments and issues can also be raised on PhysioNet's GitHub page. Updated Friday, 28 October 2016 at 16:58 EDT |
PhysioNet is supported by the National Institute of General Medical Sciences (NIGMS) and the National Institute of Biomedical Imaging and Bioengineering (NIBIB) under NIH grant number 2R01GM104987-09.
|